A Pro Guide to Preparing Meals for Freezing
Discover how preparing meals for freezing can save you time and stress. Our pro guide covers planning, cooking, and storing freezer meals for perfect results.
Love This Article?
Get personalized meal plans with recipes like this, automatically matched to your nutrition targets.
Let's be honest, the 5 PM scramble is real. That dreaded question—"What's for dinner?"—can instantly dial up the stress on an already chaotic day. But what if you had a secret weapon? What if your freezer wasn't just a frozen tundra of forgotten leftovers, but a treasure chest of delicious, home-cooked meals ready to save the day?
That's the magic of freezer meal prepping. It's not about being a super-organized, Pinterest-perfect parent. It’s a real-world strategy for taking back your weeknights, one pre-made meal at a time. This guide will show you how to turn a few hours of cooking on a Sunday into weeks of stress-free dinners.
Why Freezer Cooking is a Total Game-Changer
Dedicating a bit of time to batch cooking and freezing isn't just about convenience; it's a system that pays you back in dividends all week long.
- You get your time back. Seriously. Cook once, and you've got dinner covered for multiple nights. Those hours you save can go toward homework help, hobbies, or just putting your feet up for a minute.
- You stop throwing away food. See that bag of spinach starting to wilt? Or the great deal you got on bulk ground beef? Freezer cooking lets you turn those "use-it-or-lose-it" ingredients into meals before they go bad.
- Your family eats better. When a healthy, homemade meal is just a reheat away, you're way less likely to cave and order greasy takeout. It’s an easy win for your family’s nutrition.
- It’s a budget superhero. Planning your meals means you can shop the sales, buy in bulk, and skip those last-minute, expensive grocery runs. The impact on your food budget is huge.
And this isn't some niche hack—it's a massive global movement. The market for frozen ready meals is expected to jump from USD 298.90 billion to an astounding USD 455.25 billion by 2032. Why the boom? Because families everywhere are realizing how much batch cooking cuts down on daily stress. In fact, with our go-go-go schedules, North America holds the biggest slice of that pie at 38.1%. You can dig into more of the numbers in various market research reports.
The whole idea is simple: You're investing a little bit of time now to get a whole lot of time back later. It’s the ultimate "work smarter, not harder" kitchen philosophy.
This guide is your roadmap. We’ll cover everything you need to know, from picking recipes that actually taste better after being frozen (hello, chili and lasagna!) to learning the tricks for ingredients that can be a little fussy, like creamy sauces or crunchy veggies. A few key principles are all it takes to make you the meal-prepping hero of your household.
Your Freezer Meal Game Plan: From Chaos to Calm
Let's be real: amazing freezer meals don't magically appear. They're born from a bit of smart planning. This is your mission control, the part where a little foresight turns a few hours of kitchen time into weeks of "what's for dinner?" bliss. We're getting rid of the guesswork and the 5 PM panic.
First things first, you have to pick the right recipes. Not everything loves the arctic blast of a freezer. You're looking for dishes that hold their own or, even better, get more delicious after they've been chilled to the bone.
Your freezer's best friends are hearty, saucy meals. We're talking chilis that have time to let their flavors get to know each other, rich stews, decadent lasagnas, and enchiladas swimming in sauce. The freezer actually helps these dishes, giving all those amazing flavors time to meld into something even more special.
Think "Cook Once, Eat Twice"
One of the easiest ways to dip your toes into freezer cooking is the "double and freeze" method. It’s as simple as it sounds. The next time you’re making a freezer-friendly meal like chili or soup, just double everything. Serve half for dinner tonight and squirrel the other half away in the freezer.
This isn't some complex system; it’s just brilliant efficiency. You’re already chopping, sautéing, and simmering, so making a little extra is no big deal. It's the perfect way to start because it feels completely natural and you get an immediate payoff.
Picture it: you're making a huge, fragrant pot of spaghetti bolognese. Your family gets a fantastic dinner tonight, and with just a few more minutes of effort, you've got another family-sized meal locked and loaded for that chaotic Tuesday two weeks from now. That, my friends, is a victory.
Master the Art of "Component Prepping"
Freezing entire meals is a game-changer, but sometimes you need a little more flexibility. Enter component prepping. Instead of a finished dish, you freeze the building blocks. This gives you a massive head start, letting you throw together a "fresh" meal in a tiny fraction of the usual time.
This trick is an absolute lifesaver on busy weeknights. Here are a few ideas to get your wheels turning:
- Pre-Cooked Ground Meat: Brown a few pounds of ground beef or turkey with some onions and garlic, then freeze it in one-pound portions. Suddenly, tacos, shepherd's pie, or a quick pasta sauce are just minutes away.
- Shredded Chicken: Toss a bunch of chicken breasts in the slow cooker, shred the meat, and freeze it in two-cup bags. Now you're ready for lightning-fast quesadillas, chicken salad sandwiches, or BBQ chicken sliders.
- Veggie Starter Packs: Dice up onions, bell peppers, and celery to create a mirepoix or "holy trinity" base for soups, stews, and gumbos. Just grab a bag and toss it in the pot.
- Instant Marinades: Throw your favorite marinade and some raw chicken, pork, or beef into a freezer bag. The meat marinates as it thaws, infusing it with flavor. All that's left for you to do is grill or bake it.
Component prepping takes a 30-minute chore and turns it into a 10-minute assembly job. It’s the ultimate shortcut for when you crave a home-cooked meal but don't have the energy for all the prep.
My Favorite Trick: When you're freezing things like ground beef or shredded chicken, press the contents flat inside the freezer bag before sealing. They'll freeze in a flash, thaw way quicker, and stack neatly like books, which is a total space-saver.
Let a Little Tech Do the Heavy Lifting
Juggling meal ideas, making a shopping list, and then realizing you forgot the darn cumin can be a real headache. Why not let a little modern magic handle the boring parts?
Using a tool like Meal Flow AI can take the mental gymnastics out of planning. It can dream up freezer-friendly meal plans your family will actually eat and then zap a shopping list right to your phone. This means no more forgotten ingredients and less food waste because you're only buying what you actually need. It helps make freezer prep feel less like a chore and more like the brilliant life hack it is.
Mastering The Cook And Cool-Down Game
Let's get one thing straight: the secret to an amazing freezer meal isn't in the freezing—it's in the cooking and, just as importantly, the cooling. Nail this part, and you'll be rewarded with fantastic, ready-to-eat dinners. Mess it up, and you’re looking at mushy textures and a serious case of freezer burn.
Think of yourself as cooking for your future self. You're not just making dinner for tonight; you're creating a meal that needs to survive a deep freeze and come back to life tasting just as good as the day you made it. That means tweaking your cooking process just a little.
The Art Of The Undercook
It sounds counterintuitive, I know. But slightly undercooking key ingredients is your ticket to freezer meal glory. Since your food will cook a bit more when you reheat it, you need to pull it off the heat a little early to prevent a sad, overcooked mess later.
Here's how it works in practice:
- Pasta and Grains: Cook pasta until it's just shy of al dente—it should still have a very firm bite. This is the key to avoiding a starchy, mushy mess when you finally bake that frozen lasagna.
- Vegetables: Tossing veggies into a soup or casserole? Add them during the last few minutes of cooking. You want them crisp-tender, not soft, so they can finish cooking to perfection upon reheating.
- Blanching is Your Best Friend: For standalone veggies like green beans or broccoli, blanching is a must. A quick dip in boiling water followed by an ice bath shocks the vegetables, locking in their vibrant color, texture, and nutrients. It's a game-changer.
Knowing What Freezes Well (And What Doesn’t)
Before you even start cooking, you need a game plan. Some foods are practically made for the freezer, while others will turn into a culinary disaster. Knowing the difference is half the battle.
Here’s a quick reference to help you choose your ingredients wisely.
Best Foods for Freezing vs Foods to Avoid
| Food Category | Excellent for Freezing (And Why) | Avoid Freezing (And Why) |
| Proteins | Cooked meats, like shredded chicken, ground beef, and pulled pork. They hold their texture and absorb flavors well upon reheating. | Fried foods. The crispy coating becomes a soggy, greasy mess after thawing. No one wants a limp chicken nugget. |
| Soups & Stews | Broth-based soups, chili, and hearty stews. Their flavors often deepen and improve after being frozen. | Cream-based or dairy-heavy soups. They tend to separate and become grainy when reheated. It’s a texture nightmare. |
| Vegetables | Blanched veggies like broccoli, carrots, and peas. Also, corn and spinach. Blanching preserves their color and snap. | High-water-content veggies like lettuce, cucumbers, and raw tomatoes. They turn into a watery, mushy pulp when thawed. |
| Grains & Pasta | Slightly undercooked pasta and grains like rice or quinoa. They absorb liquid during reheating and finish cooking perfectly. | Fully cooked pasta. It gets mushy and falls apart when it’s reheated. |
| Sauces | Tomato-based sauces, pesto, and meat sauces. They freeze beautifully and are incredibly versatile for quick meals. | Mayonnaise-based sauces or dressings. The emulsion breaks, leaving you with a separated, oily disaster. |
Keep this table handy when you’re planning your meals, and you'll save yourself a lot of frustration. Stick with the winners, and you'll always have a delicious meal waiting for you.
The All-Important Cool-Down
You've cooked a masterpiece. Don't ruin it now by being impatient. Leaving a big pot of hot chili on the counter to cool for hours is a massive food safety no-no. That warm temperature is a five-star resort for bacteria. Your mission? Get that food cooled down, and fast.
Properly cooling your food is about more than just safety; it preserves the taste and texture you worked so hard to create. If you're wondering about the specifics, brushing up on safe cooling practices when putting hot food in the fridge is a great place to start.
Here's a simple visual to keep in mind for your entire meal prep workflow.
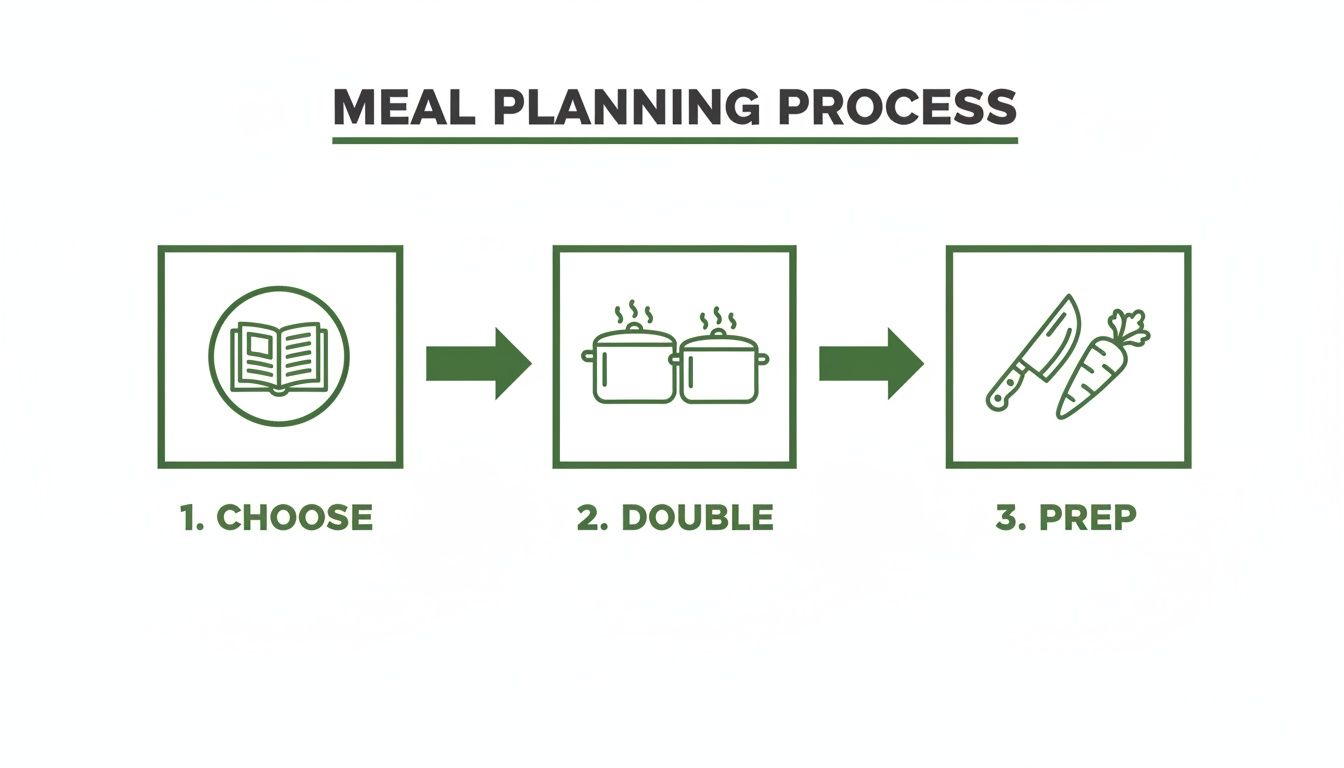
This little guide breaks it down perfectly: pick a recipe that freezes well, make a double batch, and prep it properly for its icy hibernation.
So, how do you actually cool a giant batch of soup without waiting all day?
The Golden Rule: You must get your food from cooking temperature down to below 40°F (4°C) within two hours. This is non-negotiable for preventing nasty bacteria from crashing your dinner party.
Here are a few tricks I’ve learned over the years to speed things up:
- Divide and Conquer: Don't even think about putting a massive, steaming stockpot in the fridge. Instead, divide the food into several smaller, shallow containers. More surface area equals much faster cooling.
- Give It an Ice Bath: This is the classic method for a reason. Fill your sink with ice water and place your pot of soup or sauce right in it. Stir the food every few minutes to help it cool evenly.
- Use an "Ice Paddle": In professional kitchens, we use special plastic paddles filled with frozen water to stir and cool big batches of food. You can make a DIY version by freezing water in a couple of clean, sealed plastic bottles and stirring them through your pot.
Once the steam is gone and the dish feels just lukewarm, it’s ready for the next phase. If you want a deeper dive, our guide on how to store prepped meals has you covered. Trust me, getting this cook-and-cool step right is what makes all the difference.
How to Package and Label Your Future Dinners
You've done the hard work of cooking and cooling. Now, let's talk about protecting your investment. Think of this next step as suiting up your meals in a suit of armor before they head into the frozen tundra of your freezer. Get it right, and you're locking in all that flavor and texture for a future, grateful you.
The number one enemy we're fighting here is air. Air is what causes that dreaded freezer burn—those icy crystals and weird, dried-out textures that ruin a perfectly good meal. Your mission, should you choose to accept it, is to get every last bit of air out before sealing the deal.
Choosing Your Freezer Armor
Not all containers are up to the challenge of a deep freeze. Each has its pros and cons, and the best choice really depends on what you're stashing away.
- Glass Containers: I love glass. They’re sturdy, non-porous, and can often go straight from the freezer to the oven. The catch? They’re heavy, can be pricey, and you absolutely must leave about an inch of headspace for liquids to expand, otherwise you’ll have a cracked-glass catastrophe on your hands.
- Plastic Containers: A solid, budget-friendly choice. Just make sure you’re grabbing BPA-free plastic that’s specifically rated for the freezer. Their only real downside is that they can get stained or hold onto odors from things like tomato sauce or curry.
- Disposable Foil Pans: These are your best friend for freezer-to-oven casseroles like lasagna or enchiladas, especially if you plan on giving the meal to someone else. They’re super convenient but not the greenest option for regular use.
- Reusable Silicone Bags: The MVPs of the freezer world. These are brilliant for soups, stews, marinades, or smoothie packs. They're flexible, reusable, and make the "flat freeze" technique (more on that below!) an absolute dream.
If you want to dive deeper into the nitty-gritty of container science, check out our guide on what containers are freezer safe.
My Favorite Space-Saving Hack: The Flat Freeze
Is your freezer a chaotic mess of oddly shaped containers? The "flat freeze" is about to change your life. This little trick transforms your freezer from a jumbled Tetris game into a beautifully organized library of deliciousness.
It's so simple:
- Pour your cooled soup, chili, or sauce into a heavy-duty, zip-top freezer bag.
- Squeeze out as much air as humanly possible while sealing it almost completely shut.
- For the final touch, leave a tiny corner open and pop in a straw to suck out that last bit of stubborn air before zipping it tight.
- Lay the bag flat on a cookie sheet and slide it into the freezer.
Once it’s frozen solid, you’ve got a perfect, stackable brick of food. You can line them up like books, saving an incredible amount of space.
Pro Tip: Whatever you do, don't overfill the bags! It's the most common mistake. Leaving a little room prevents messy leaks when the liquid expands and makes it way easier to press the bag flat for perfect, even freezing.
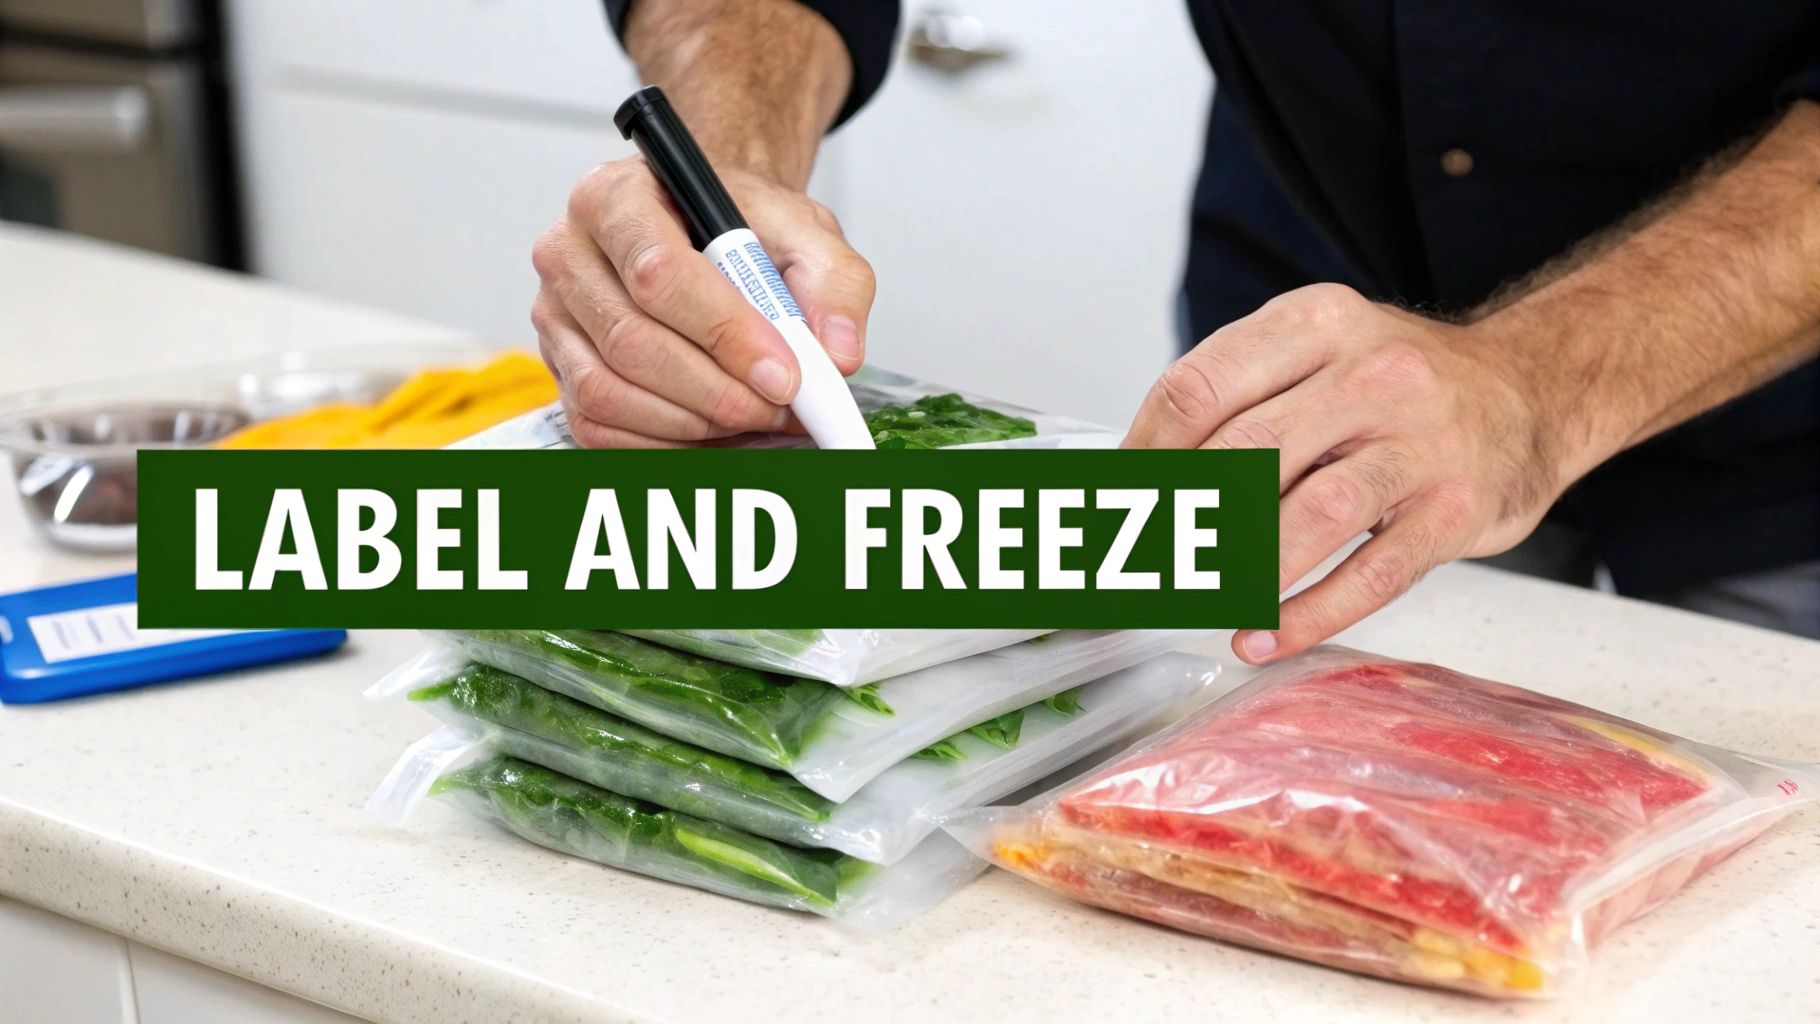
The Unsung Hero of Meal Prep: Labeling
Listen to me on this: label everything. I don’t care if you think you’ll remember what that reddish-orange frozen block is. In three months, it's just a UFO (Unidentified Frozen Object). Is it chili? Is it spaghetti sauce? Don't play "freezer roulette" with dinner.
Think of your label as a mini instruction manual for Future You. A little piece of masking tape and a Sharpie is all it takes.
Every single label needs this info:
- What it is: Be specific! "Spicy Turkey Chili," not just "Chili."
- When you froze it: The date is crucial for following the "first in, first out" rule.
- How to reheat it: A quick note like "Thaw in fridge, bake @ 375°F for 40 min" is a gift to your future, exhausted self.
This tiny step takes all of 30 seconds, but it prevents so much waste and confusion down the road. It ensures nothing gets lost to the icy abyss in the back of your freezer and that you're always eating food at its peak.
Thawing and Reheating for Perfect Results
You’ve done the hard work—the planning, the chopping, the cooking. Now for the glorious payoff. But bringing your frozen meals back to life without turning them into a sad, mushy shadow of their former selves? That’s an art form.
Get this part right, and you'll have everyone convinced you just spent the last hour in the kitchen.
Honestly, how you thaw and reheat your food is just as critical as how you cooked it in the first place. The goal is to lock in that amazing texture and flavor you worked so hard to create. Rushing the process is a one-way ticket to a disappointing dinner.
The Safest Ways to Thaw Your Meals
When it comes to thawing, patience is your best friend. I know it’s tempting to just leave a frozen block of chili on the counter all day, but that’s a massive food safety no-no. Bacteria loves to party in the "danger zone" between 40°F and 140°F.
Let's skip the food poisoning and stick to one of these three expert-approved methods:
- In the Refrigerator: This is the gold standard, and for good reason. It’s hands-down the safest method, letting your meal thaw slowly and evenly. A one-pound meal can take up to 24 hours, so a little planning is key.
- In Cold Water: Need dinner a bit faster? Submerge your sealed, leak-proof container in a large bowl of cold tap water. The crucial part? You have to change the water every 30 minutes to keep it safely chilled. A one-pound package can thaw in about an hour this way.
- In the Microwave: This is your last-resort, "oops, I forgot to take anything out" option. Use your microwave’s defrost setting, but be ready to cook the meal immediately after it thaws. This method can create warm spots where bacteria might start to grow.
Knowing how to handle specific situations, like the best way for grilling frozen chicken, can seriously expand your freezer meal game. And for extra peace of mind, getting familiar with food safety timelines, like how long does cooked chicken last in the fridge, is always a smart move.
Reviving Your Meals for Maximum Flavor
Once it’s thawed, reheating is the final hurdle to dinner-time glory. The best technique really depends on what you're making. My go-to rule is to try and match the reheating method to the original cooking method.
A splash of fresh liquid is my secret weapon. A little broth for a stew, a bit of milk for a creamy sauce, or even a tablespoon of water for pasta can rehydrate and revive a dish, making it taste vibrant and fresh.
Think about how you first made the meal. Did you bake it? Simmer it on the stove? That’s your biggest clue for bringing it back to life perfectly.
Reheating Techniques for Different Dishes
Here’s a quick-and-dirty guide to reheating some freezer meal favorites:
| Meal Type | Best Reheating Method |
| Casseroles & Bakes | Oven. Cover with foil to stop it from drying out and bake at 350°F until it's hot and bubbly. This gentle, even heat is perfect for things like lasagna or baked ziti. |
| Soups, Stews & Chili | Stovetop. Gently reheat in a saucepan over medium-low heat, giving it a stir now and then. This gives you total control to add a splash of broth if it's gotten too thick. |
| Pasta Dishes | Stovetop or Microwave. For saucy pasta, a gentle reheat in a skillet with a tiny bit of water works wonders. For plain pasta, a quick zap in the microwave with a damp paper towel on top steams it back to life. |
| Cooked Meats | Oven or Skillet. For pulled pork or shredded chicken, pop it in a covered dish in the oven or a skillet with some sauce or broth to keep it juicy. |
Finally, never underestimate the power of a fresh garnish. A sprinkle of parsley, a dollop of sour cream, or a fresh grating of Parmesan can elevate a reheated meal from "good" to "wow." It’s these little finishing touches that make all your prep work totally worth it.
Got Freezer Meal Questions? I've Got Answers.
Jumping into the world of freezer meals feels a bit like discovering a secret kitchen superpower, doesn't it? But even superheroes have questions when they're figuring out their new abilities. If you’ve got a few things you’re wondering about, you’re in good company.
Let's clear up some of the most common questions I hear. Think of this as your personal freezer meal hotline—no question is too small.
How Long Does This Stuff Actually Last in the Freezer?
This is the big one, right? The million-dollar question. Here’s the simple truth: from a pure food safety standpoint, anything kept frozen solid at 0°F (-18°C) is safe to eat forever. The cold basically hits the pause button on nasty bacteria.
But here’s the catch: safety and quality are two very different things. Over time, even the most perfectly prepped meal will start to lose its flavor, get a weird texture, or suffer from the dreaded freezer burn. This is exactly why dating your meals isn't just a suggestion; it's a non-negotiable rule.
Here are some general timelines I stick to for the best taste:
- Soups, Stews, and Casseroles: These are best within 3 to 4 months. Their high water content can lead to ice crystals and texture changes if they hang around for too long.
- Cooked Meat & Poultry: Pulled pork, shredded chicken, and meatballs hold up beautifully for up to 6 months.
- Baked Goods: Muffins, quick breads, and un-frosted cakes are great for about 3 months before they start tasting a little… well, frozen.
My best advice? Treat your freezer like a library. The goal is to keep rotating your stock—always grab the oldest "book" off the shelf first.
Can I Really Freeze Things with Dairy in Them?
Ah, dairy. It’s the notoriously tricky customer of the freezer world. The short answer is yes, but you have to be smart about it. Some dairy freezes like a dream, while others throw a tantrum and turn into a grainy, separated mess when you thaw them.
Dishes packed with hard cheeses, like a hearty lasagna or a cheesy baked ziti, are freezer gold. They just get meltier and more delicious when reheated. It’s the creamy, delicate stuff that needs a little extra thought.
My Personal Rule of Thumb: If a recipe calls for stirring in something creamy at the very end—like sour cream in a stroganoff or heavy cream in a tomato soup—I just don't. I freeze the dish without it and add that fresh dairy during the last few minutes of reheating on the stove. It guarantees that silky, perfect texture every single time.
If you absolutely must freeze a cream-based sauce, remember this: fat is your friend. High-fat dairy like heavy cream or full-fat coconut milk holds up way better than low-fat options like milk or half-and-half.
What are the Best Plastic-Free Freezer Containers?
Trying to ditch plastic is a fantastic goal, and you've got some great options that are practically made for freezer cooking.
- Borosilicate Glass Containers: These are the tanks of my plastic-free freezer. They’re super durable, they never stain or hold onto smells, and you can often take them right from the freezer to the oven (but always double-check the manufacturer's rules!). Just remember to leave at least an inch of empty space at the top so liquids have room to expand.
- Reusable Silicone Bags: A total game-changer. These are what make the "flat freeze" technique possible, which saves an unbelievable amount of space. They’re tough, flexible, and a breeze to clean.
- Stainless Steel Containers: You can't pop them in the microwave, but stainless steel is awesome for storing solid items like muffins, energy balls, or cooked burger patties. They’re lightweight and practically indestructible.
- The Parchment Paper Trick: This is a clever one for casseroles. Line your baking dish with parchment paper, leaving some hanging over the sides. Assemble the meal right in the dish, freeze it solid, and then use the parchment paper "handles" to lift the entire frozen block out. Wrap it up tightly and store it. When you’re ready to bake, just unwrap it and plop it right back into the original dish!
Help! My Freezer is Tiny!
A small freezer isn't a dealbreaker; it just means you have to be a more strategic player in the meal prep game. You need to think like an architect and maximize every single square inch of that precious frozen real estate.
Your new mantra is "Freeze Flat, Stack High."
This is where you fully embrace those reusable silicone or freezer-safe plastic bags. Pour everything from chili to bolognese sauce into them, squeeze the air out, seal, and lay them flat on a baking sheet to freeze. Once solid, they become thin, frozen planks that you can file away vertically, like books on a shelf. It's a massive space-saver.
Another brilliant move for small spaces is to focus on "component prepping" instead of freezing entire bulky meals.
| Approach | What It Looks Like | Space Impact |
| Full Meal Prepping | Freezing entire casserole dishes or giant tubs of soup. | High. Bulky, awkward shapes waste a ton of valuable corner and vertical space. |
| Component Prepping | Freezing flat bags of taco meat, shredded chicken, or sofrito veggie bases. | Low. Thin, uniform shapes stack like a dream, using every last inch efficiently. |
Having a small freezer stocked with these meal-starter components gives you way more flexibility for weeknight dinners without dedicating all your space to just two or three meals.
---
Feeling inspired to take control of your meal times? At Meal Flow AI, we make the planning part effortless. Our system generates freezer-friendly meal plans and sends the shopping list straight to Instacart, so you can spend less time stressing and more time enjoying delicious, home-cooked meals. Discover how easy it can be at https://mealflow.ai.